Joining phenomenal machine learning course fast.ai using free Google Colaboratory setup.

Joining phenomenal deep learning course fast.ai using free Google Colaboratory setup.
My colleague Ilia Lebedev @melevir at twitter recommended me a cool deep learning course at http://course.fast.ai.
Much appreciation to Jeremy and Rachel who gave us this opportunity to learn. They position themself as a course for software developers, not data scientists. This course is of January 2018, is the second version.
Listen that the course said for itself.
YOU WILL LEARN HOW TO:
- New Set up your own GPU server in the cloud
- Use the fastai and Pytorch libraries in python to train and run deep learning models
- Build, debug, and visualize a state of the art convolutional neural network (CNN) for recognizing images
- Build state of the art recommendation systems using neural-network based collaborative filtering
- Build state of the art time series and structured data models using categorical embeddings
- Get great results even from small datasets, by using transfer learning
- Understand the components of a neural network, including activation functions, dense and convolutional layers, and optimizers
- Build, debug, and visualize a recurrent neural network (RNN) for natural language processing (NLP), including developing a sentiment classifier which beat all previous academic benchmarks.
- Recognize and deal with over-fitting, by using data augmentation, dropout, batch normalization, and similar techniques
Back to a setup for fast.ai course using free Google Colaboratory.
In this post, I will show how to use organize setup of Google Colaboratory for the fast.ai deep learning course. You should repeat this simple steps every time you connect to a new GPU.
In order to train a neural network, we will most certainly need Graphics Processing Unit (GPU) – and not everyone have a fast one. Without a decent GPU a singe step will last for hours instead of minutes. Sign-up to Google Colaboratory to get a hosted Jupyter notebook environment connected with a free Tesla K80 GPU.
You can use GPU as a backend free for 12 hours at a time. That is very good news for us!
The steps to repeat every time you connect to a new GPU.
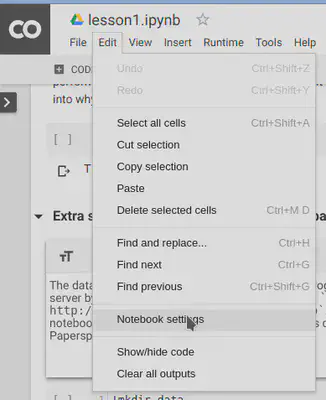
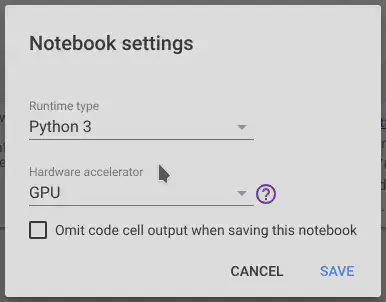
Setup step 0: Select Free GPU
It is so simple to alter default hardware (CPU to GPU or vice versa); just follow Edit > Notebook settings or Runtime>Change runtime type and select GPU as Hardware accelerator.
Setup step 1: install libraries for fast.ai course.
Enter this code in a new code block on top of a notebook:
# Install torch compatible with fastai
from os import path
from wheel.pep425tags import get_abbr_impl, get_impl_ver, get_abi_tag
platform = '{}{}-{}'.format(get_abbr_impl(), get_impl_ver(), get_abi_tag())
accelerator = 'cu80' if path.exists('/opt/bin/nvidia-smi') else 'cpu'
!pip install -q http://download.pytorch.org/whl/{accelerator}/torch-0.3.1-{platform}-linux_x86_64.whl fastai torchvision
This will take a while.
Setup step 2: model weights download.
# Model weights for other network architectures (e.g. resnext50):
!wget -q http://files.fast.ai/models/weights.tgz && tar -xzf weights.tgz -C /usr/local/lib/python3.6/dist-packages/fastai
The step 2 will take a while too, need to download and unpack 1.1 Gb.
Setup step 3: dataset download.
For lesson 1, 2, 3 you need dogs $ cats dataset. This code does it. The dataset dogs & cats is available at http://files.fast.ai/data/dogscats.zip.
!mkdir -p data
!wget -q http://files.fast.ai/data/dogscats.zip
!unzip -q dogscats.zip -d data/
Some lessons as 2nd use Kaggle datasets, but it is a theme for another article.
Summary of all my setup steps you can copy from my Github Gist Fast.ai install script.py.
I will try to keep it updated as long as I have interest in fast.ai and Google Colaboratory.
Denis Trofimov
Lead Platform Engineer
Lead Cloud Platform Developer. I enjoy creating Kubernetes Operators and such :)